To plan your undercounter ice maker, guarantee proper ventilation by placing vents where airflow isn’t blocked and using suitable exhaust fans to prevent overheating. Set up drainage lines that are secure, properly sized, and easy to access for maintenance. To keep noise low, position the unit away from quiet zones, and use insulation or vibration pads. Avoid common mistakes like improper placement or poor sealing—more tips to help you optimize your setup are just ahead.
Key Takeaways
- Proper ventilation placement ensures efficient heat dissipation, prevents overheating, and prolongs the ice maker’s lifespan.
- Correct drainage setup with secure connections and regular maintenance avoids water backups and leaks.
- Selecting quiet, high-performance fans and strategic placement minimizes operational noise and disruption.
- Adequate venting and drainage planning reduces energy consumption and supports consistent ice production.
- Regular inspection and maintenance of vents, fans, and drainage systems ensure reliable, efficient, and quiet operation.

SOZT® Commercial Ice Maker Machine 450LBS/24H, Stainless Steel Under Counter Ice Machine with 200LBS Storage Bin, Self-Cleaning Freestanding Ice Cube Maker for Restaurant, Bar, Home, Office
✅[HIGH EFFICIENCY & MASSIVE OUTPUT]: Never run out of ice again! Equipped with a powerful compressor, this commercial…
As an affiliate, we earn on qualifying purchases.
As an affiliate, we earn on qualifying purchases.
Why Proper Ventilation Is Critical for Your Ice Maker
Proper ventilation is essential for your undercounter ice maker to operate efficiently and avoid overheating. When ventilation is adequate, your ice maker maintains ideal energy efficiency, reducing power consumption and preventing unnecessary wear on components. Proper airflow helps keep the compressor and motor cool, which can extend the device’s lifespan. Additionally, good ventilation simplifies maintenance schedules by preventing dust buildup and overheating issues that could lead to malfunctions. Without proper airflow, your ice maker may work harder than necessary, increasing energy use and risking damage. Regularly checking and ensuring proper ventilation allows the appliance to run smoothly, saving you money on energy bills and costly repairs over time. Proper ventilation also supports Free Floating in your backyard setup, ensuring all outdoor appliances operate safely and efficiently. Ensuring proper ventilation systems can further enhance overall appliance performance and longevity. Prioritizing adequate airflow is a key step in maintaining your ice maker’s performance and longevity, as it helps prevent overheating issues that can lead to component failure. Proper airflow management is vital for consistent operation and avoiding potential breakdowns.

1901A Ice Maker Drain Pump Kit – Replacement for Whirlpool Ice Machines 2185528, 2208534, PS3650734 – 10 Ft Lift, Fits 50-Lb Ice Makers (Manufactured in The Year 2000 or Later)
OEM-Spec Replacement – Precision Fit: Engineered to OEM specifications, this 1901A drain pump kit delivers the same fit,…
As an affiliate, we earn on qualifying purchases.
As an affiliate, we earn on qualifying purchases.
How to Find the Best Spot for Ventilation in Your Space
Choosing the right spot for your ice maker’s ventilation is essential for ideal performance. You want to position the vents where airflow isn’t blocked and proper circulation is maintained. Make sure there are no obstructions around the vents to keep your unit running smoothly. Proper ventilation placement can also help reduce noise and improve energy efficiency. Additionally, consider the ownership essentials to ensure your space accommodates future maintenance needs and upfitting considerations. Evaluating the cost of ownership can help you select a location that minimizes ongoing expenses and simplifies upkeep. To ensure reliable operation, it’s also important to assess ventilation requirements to prevent overheating and potential damage over time. Regularly testing airflow and clearance can help maintain optimal conditions and prolong the lifespan of your ice maker.
Proper Vent Placement
Finding the right spot for your vent is vital to guarantee your undercounter ice maker runs efficiently and safely. Proper vent placement enhances ventilation aesthetics, ensuring it blends seamlessly with your space without drawing unwanted attention. When considering ice maker placement, choose a location that allows easy airflow and isn’t obstructed by cabinetry or other appliances. Avoid areas that are too tight or enclosed, as restricted airflow can cause overheating and reduce performance. Position the vent where it can effectively dissipate heat while maintaining a clean look. Take into account the overall design, making sure the vent’s location complements your kitchen layout. Clear, accessible, and well-ventilated spots improve efficiency and keep your ice maker operating smoothly. Incorporating smart‑home integrations can also help monitor and optimize airflow and temperature for enhanced performance. Proper ventilation is essential to prevent heat buildup and ensure the longevity of your appliance, especially considering the importance of adequate airflow in Gold IRA markets and other specialized systems. Ensuring proper airflow management not only extends your appliance’s lifespan but also maintains consistent ice production. Additionally, understanding the plant properties involved in ventilation can help you select materials and designs that improve airflow and reduce noise levels.
Avoid Obstructed Vents
To guarantee your ice maker operates efficiently, you need to avoid vents that are blocked or obstructed. Ventilation obstructions can cause the unit to overheat or work harder, reducing its lifespan. Carefully consider vent placement, ensuring nothing blocks airflow around the vents. Keep the area clear of clutter, appliances, or cabinetry that could restrict air circulation. Check that vents are positioned in open spaces with good airflow, not tucked behind objects or furniture. Proper vent placement allows for ideal heat dissipation and prevents airflow issues that could impair your ice maker’s performance. Regularly inspect the vents to ensure they remain unobstructed, and make adjustments if necessary. Clear, well-placed vents are essential for maintaining efficient operation and avoiding costly repairs. Maintaining proper ventilation can also contribute to safety standards about your appliance’s functioning and encourage proactive maintenance habits. Additionally, ensuring proper ventilation practices can prevent overheating and improve the overall longevity of your appliance. Proper airflow management is crucial to prevent moisture buildup and ensure consistent ice production.

COTLIN 15" W Drainless Under Counter Ice Maker with 22LBS Storage Bin, Crescent Ice, Free Standing Built-in Ice Maker for Residential Commercial Use, No Drain Required, ETL Approved, 2026 Upgraded
【Upgraded Drainless Ice Maker】This under counter ice maker is made of brushed stainless steel, which is more durable…
As an affiliate, we earn on qualifying purchases.
As an affiliate, we earn on qualifying purchases.
Installing Ventilation Grilles and Exhaust Fans Made Easy

When installing ventilation grilles and exhaust fans, placing them correctly is essential for ideal airflow. You’ll want to select fans that match the size and needs of your space to guarantee efficient operation. Proper placement and suitable fans make maintenance easier and improve your ice maker’s performance. Additionally, choosing the right type of fan—such as an exhaust fan with appropriate ventilation capacity—ensures optimal airflow and reduces noise levels. Considering the impact of airflow on system efficiency can help in selecting the most suitable ventilation components for your setup.
Proper Vent Placement
Proper vent placement is essential for guaranteeing your undercounter ice maker operates efficiently and safely. Correct positioning promotes ideal airflow patterns, which prevent overheating and reduce noise. When installing vents, consider ventilation aesthetics to keep the unit discreet and visually pleasing. Proper placement ensures unobstructed airflow, minimizing heat buildup and maintaining ice quality. Here’s a quick guide:
| Location | Benefits |
|---|---|
| Near the top | Enhances airflow patterns; expels hot air efficiently |
| Near the bottom | Promotes fresh intake and cools internal components |
| Behind cabinetry | Keeps vents hidden; maintains aesthetics |
| Away from obstructions | Ensures consistent airflow and noise reduction |
Additionally, understanding ventilation categories can help you select the most suitable type of vent for your setup. Proper vent placement also supports thermal management, which is crucial for the longevity and performance of your ice maker.
Choosing Suitable Fans
Selecting the right fans is essential for effective ventilation of your undercounter ice maker. Proper fan selection ensures ideal airflow, preventing heat buildup and noise issues. When choosing fans, consider factors like size, power, and noise level to achieve airflow enhancement. Visualize a quiet, compact fan mounted discreetly, efficiently pulling warm air away. Think of a high-performance fan quietly operating, with blades spinning smoothly to maintain airflow. Imagine a vent grille complemented by a sturdy exhaust fan, seamlessly integrated into your setup. Focus on fans that balance power and quiet operation, ensuring your ice maker stays cool without excess noise. Proper fan selection enhances ventilation, prolongs equipment life, and keeps your space comfortable.

Anti Vibration Pads for Washing Machine with Tank Tread Grip – 4 Pack + Level – Fits Most Round Feet up to 1.75” – Stops Washer Dryer from Moving – Rubber Antivibration Stabilizer for Leveling Washer
NOT UNIVERSAL – This product ONLY fits washer feet less than 1.75" in diameter and requires a 1"…
As an affiliate, we earn on qualifying purchases.
As an affiliate, we earn on qualifying purchases.
Drainage Options That Prevent Water Damage and Freezing
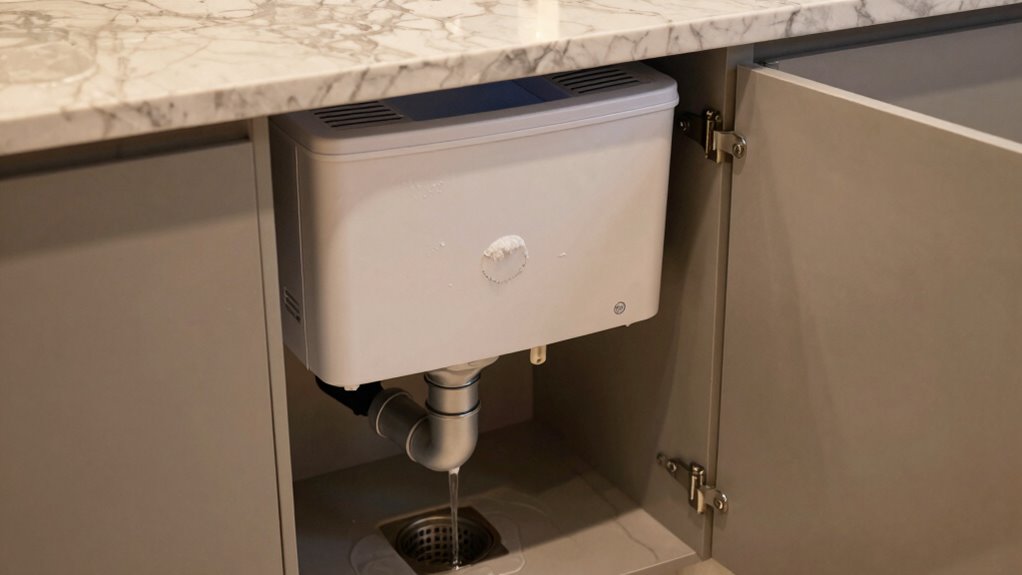
Effective drainage is essential for preventing water damage and freezing issues in your undercounter ice maker. To achieve this, implement waterproofing measures around the unit and drainage area, such as sealing joints and installing drip trays. Proper drainage systems ensure excess water flows away efficiently, reducing the risk of pooling or leaks. Regular maintenance schedules are critical; check for clogs, inspect hoses, and clear debris to keep water flowing smoothly. Use drain lines made of durable, frost-proof materials to prevent freezing during colder months. Ensure the drain is positioned lower than the unit for gravity-assisted flow, and consider insulation around drainage pipes if temperatures drop markedly. These steps help keep your ice maker functioning safely and efficiently, avoiding costly water damage.
Choosing the Right Drain Line Setup for Your Ice Maker

Choosing the right drain line setup is essential to guarantee your ice maker works efficiently and prevents leaks. Make sure your drain line is properly sized to handle the water flow, and secure connections tightly to avoid backups. Paying attention to these details keeps your system running smoothly and avoids costly water damage.
Proper Drain Line Sizing
Ensuring your drain line is properly sized is essential for the reliable operation of your undercounter ice maker. An appropriately sized drain prevents backups and guarantees smooth water flow. Consider drain line materials that resist corrosion and are easy to clean, like PVC or flexible tubing. Water pressure considerations also influence your sizing—too narrow, and water may back up; too wide, and it may cause unnecessary slack. Imagine the drain line as a clear pathway, free of kinks and blockages, with a gentle slope guiding water to the drain.
- Smooth, rigid materials like PVC for durability
- Adequate diameter to prevent clogs
- Proper slope for gravity-assisted drainage
- Secure fittings to avoid leaks
Secure Connection Techniques
A secure drain line connection prevents leaks and water damage, keeping your ice maker running smoothly. To ensure this, follow proper security protocols and use secure fittings and clamps. Properly securing the drain line minimizes risks of disconnection or leaks. Additionally, consider data encryption for smart or connected systems to protect your setup from cyber threats. Here’s a quick overview:
| Connection Type | Security Tip | Best Use Case |
|---|---|---|
| Flexible tubing | Regular inspections, secure clamps | Easy installation, adaptable |
| PVC pipe | Use primer and cement, secure joints | Permanent setup, durability |
| Quick-connect fittings | Ensure tight fit, check regularly | Convenience, quick maintenance |
Choosing the right setup and securing connections protect your investment and ensure reliable operation.
Making Drain Lines Easy to Access and Maintain

Accessing and maintaining drain lines can substantially impact your ice maker’s performance, so it’s essential to plan their placement carefully. Proper positioning simplifies drain line maintenance and makes ventilation troubleshooting easier. Imagine:
- A removable panel that grants quick access to the drain connection
- Clear, flexible tubing routed along accessible pathways
- Valves positioned at convenient heights for easy shutoff
- Labels indicating flow direction for quick inspections
These features help you avoid leaks, clogs, or drainage issues that could hamper ice production. An accessible drain line reduces downtime and streamlines maintenance. When planning, choose locations that allow you to easily inspect, clean, or replace components without disrupting the unit. This ensures your undercounter ice maker runs smoothly and stays efficient over time.
Soundproofing Tips for a Quiet Ice Maker Operation

Proper placement and maintenance of drain lines can reduce noise from water flow and vibrations, but addressing sound levels further enhances your ice maker’s operation. To improve soundproofing, consider installing the unit on a vibration-absorbing pad or insulating the surrounding area with soundproof mats. These steps help minimize operational noise and boost energy efficiency by reducing unnecessary energy loss. Regular maintenance routines, like tightening loose panels and replacing worn parts, also prevent rattling sounds. Keep the compressor and fan areas clean to avoid excess noise from dust buildup. By combining strategic placement, proper insulation, and routine upkeep, you ensure your ice maker runs quietly, saving energy and extending its lifespan.
Best Placement Tips to Minimize Noise Disruption
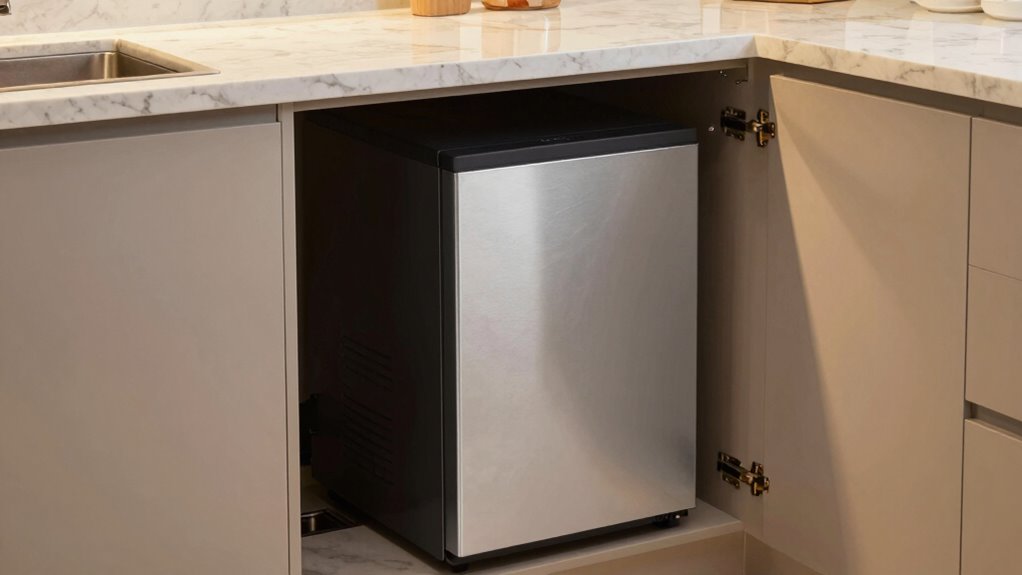
Placing your ice maker in the right location is key to reducing noise disruption in your space. Proper placement considers factors that boost noise mitigation and prevent disturbance. To achieve this, avoid placing it near quiet zones like bedrooms or offices. Instead, choose a spot with some distance from main living areas. Consider these placement considerations:
- Position it against a wall with soundproofing or insulation
- Keep it away from shared walls or thin partitions
- Place it on a sturdy, vibration-absorbing surface
- Avoid placing it near appliances that generate excess noise
How Insulation and Vibration Pads Reduce Noise

Insulation and vibration pads play a essential role in minimizing the noise generated by your undercounter ice maker. Insulation advantages include reducing the transfer of sound and heat, keeping your space quieter and more energy-efficient. Vibration pads absorb and dampen vibrations caused by the machine’s motor and compressor, preventing noise from transmitting through surfaces. Here’s a quick comparison:
| Feature | Benefit |
|---|---|
| Insulation benefits | Keeps noise contained, improves efficiency |
| Vibration pads | Dampen vibrations, reduce structural noise |
Using both insulation and vibration pads together ensures your ice maker operates quietly, enhancing your environment’s comfort. Proper installation of these components makes a noticeable difference in noise reduction and overall performance.
Common Mistakes to Avoid When Installing Your Ice Maker
Installing your ice maker correctly is essential for peak performance, but many overlook common pitfalls that can cause issues down the line. One mistake is neglecting proper ventilation, which can lead to overheating and damage. Failing to level the unit may cause water drainage problems and disrupt ice production. Ignoring clearance space can hinder ice maker maintenance and access for repairs. Additionally, not reviewing warranty considerations might leave you unprotected if problems arise. Be sure to check the installation instructions carefully and avoid shortcuts. Proper setup ensures efficient operation and longevity. Remember, a well-installed ice maker minimizes noise issues and reduces the risk of costly repairs later, keeping your investment protected and your ice supply steady.
Frequently Asked Questions
How Often Should I Clean My Ice Maker’s Ventilation System?
You should clean your ice maker’s ventilation system at least every three to six months. Regular ventilation maintenance guarantees proper airflow, prevents overheating, and keeps your ice maker running efficiently. During installation, make sure the ventilation is unobstructed. If you notice reduced performance or strange noises, it’s time to check and clean the ventilation system. Consistent upkeep helps prolong your ice maker’s lifespan and maintains ideal ice production.
What Are the Signs of Poor Drainage in My Ice Maker Setup?
You’ll notice poor drainage in your ice maker if you see water leaks or pooling around the unit. Clogged filters can cause water to back up, leading to drainage issues, so check and clean them regularly. If you see standing water or leaks, it’s a sign the drainage system needs attention. Addressing clogged filters and fixing leaks promptly keeps your ice maker running smoothly and prevents further problems.
Can Noise Levels Vary Between Different Ice Maker Models?
Yes, noise levels can vary between different ice maker models. When you compare noise levels, you’ll notice some models operate more quietly due to design differences and insulation. Model variability plays a significant role; newer or higher-end models often feature quieter components and better soundproofing. So, if noise is a concern, it’s worth checking the noise comparison ratings for each model before making your choice.
How Can I Upgrade My Existing Ventilation for Better Performance?
Time to turn over a new leaf and boost your ventilation system. You can upgrade your existing setup by installing larger or additional vents, ensuring unobstructed airflow for better ventilation efficiency. Consider adding a ventilation fan or adjusting duct placement to enhance airflow optimization. Regularly clean and inspect vents for dust buildup. These steps help your ice maker run smoother, reduce noise, and prevent overheating—making your setup more reliable and efficient.
Are There Specific Materials Recommended for Quiet Drainage Lines?
You should choose drainage pipe materials like PVC or ABS, as they are durable and help reduce noise transmission. For added soundproofing, consider installing soundproofing options such as foam insulation around the pipes or flexible connections that dampen vibrations. These choices can markedly decrease noise levels, ensuring your undercounter ice maker operates quietly and efficiently while maintaining proper drainage.
Conclusion
Think of your undercounter ice maker as a delicate symphony—each note, from ventilation to drainage to noise control, must be perfectly tuned. By paying attention to these basics, you’ll guarantee smooth, reliable operation that’s as quiet as a whisper and as invigorating as ice on a hot day. When you optimize your setup, you’re conducting a master performance that keeps your space cool, clean, and trouble-free.