TL;DR
A closet can become an effective vocal booth with the right placement and acoustic treatment. Focus on controlling reflections, sealing gaps, and ventilating properly to get professional sound without expensive gear.
Imagine transforming your tiny closet into a slick, whisper-quiet vocal booth. It’s easier than you think, and it doesn’t require tearing down walls or spending a fortune. All it takes is knowing where to place your gear, what materials to use, and how to control sound reflections.
This guide unpacks how to make your closet work for you—whether you’re recording vocals, voiceovers, or just practicing. Expect practical advice, real-world examples, and simple tweaks that turn a cluttered closet into a professional sound space. You can also learn more about acoustic dampening and placement for your setup.
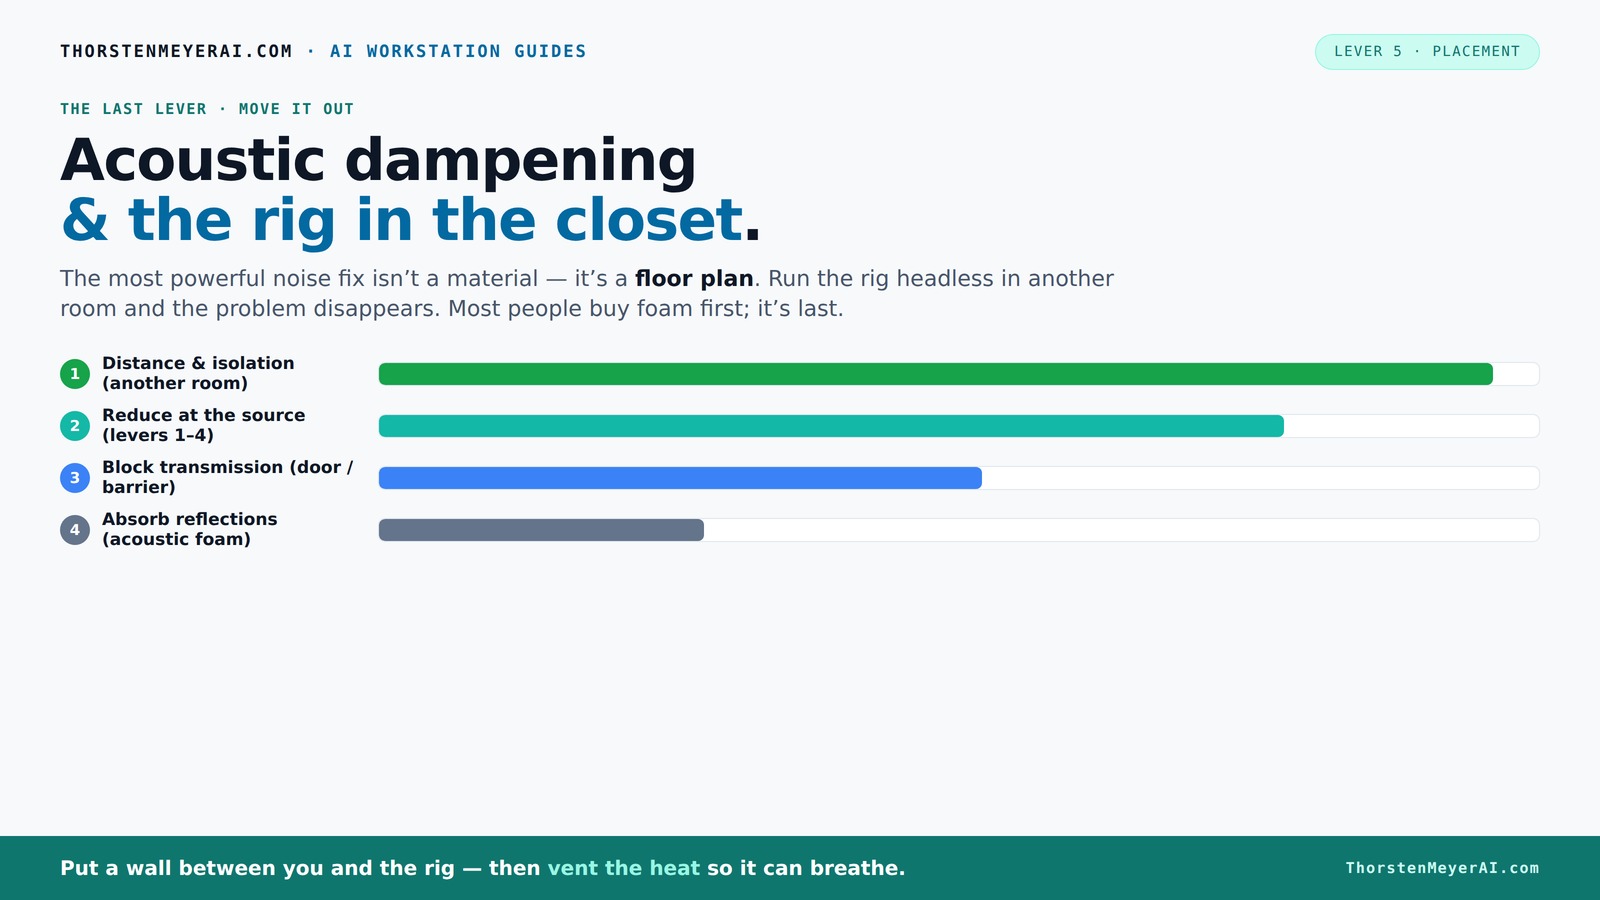
Acoustic dampening
& the rig in the closet.
The most powerful noise fix isn’t a material — it’s a floor plan. A rig you can’t hear because it’s in another room beats any amount of foam. Tap the approaches in Part 1 to see what actually works.
(another room)
(levers 1–4)
(door / barrier)
(acoustic foam)
Contain the noise, not the heat
Key Takeaways
- Moving your rig into another room or closet instantly reduces noise and reflection issues.
- Effective ventilation is crucial when placing a high-heat rig in an enclosed space—avoid overheating and noisy fans.
- Placement of treatments at reflection points and corners dramatically improves sound quality more than just adding foam panels.
- Sealing gaps around doors and hard surfaces prevents sound leakage and enhances your room’s isolation.
- Soft materials like rugs and blankets are easy, affordable ways to tame reflections in small spaces.

Focusound 52 Pack Acoustic Foam Panels 1" x 12" x 12" Sound Proof Foam Panles Soundproofing Noise Cancelling Wedge Panels for Home Office Recoding Studio with 300PCS Double-Side Adhesive
Soundproofing - Acoustic foam panels triangular grooves structure for better noise absorption, helps to reduce and absorb unwanted...
As an affiliate, we earn on qualifying purchases.
As an affiliate, we earn on qualifying purchases.
Why Moving Your Rig Is the Fastest Way to Quieter Sound
The most effective way to cut noise is to put distance between your computer or audio gear and your ears. Think of it like a noise barrier—moving the entire setup into another room, or even a closet, silences the sound at the source. This way, your workspace stays silent, and you don’t waste money on foam or barriers that only soften reflections.
For example, a voice actor I know placed their mic and computer in a spare closet on the other side of the house. They now record with the door closed, and the sound is almost non-existent in their recording space.
All you need is a stable network connection (wired or Wi-Fi) and proper ventilation—more on that later. This approach often costs nothing but a little repositioning, but the results are remarkable.

118” Wedge-Shape Foam Window Weather Stripping Door Seal Strip,Soundproofing Frame Winter Insulation Tape for Exterior Front Door,Noise Cancelling Window Inserts,Door Gap Filler Light Blocker,White
Upgraded Wedge Design: This window draft stopper features an upgraded wedge design, tapering from 5/32" to 11/32" (0.16"–0.35")...
As an affiliate, we earn on qualifying purchases.
As an affiliate, we earn on qualifying purchases.
The 'Rig in the Closet' Setup — Why Ventilation Is Key
Putting a high-performance, heat-generating machine in a closet sounds like a recipe for disaster. The core issue: trapped heat. Without proper airflow, your rig can overheat, throttle performance, and produce louder fans—undoing all your noise-reduction efforts.
For instance, a YouTuber built a closet booth with a small exhaust fan and passive vents. The temperature stayed stable even after hours of heavy use, and the noise level dropped significantly. They used a dedicated soundproof cabinet with ducted airflow to keep the heat out and noise down.
To avoid overheating, consider active ventilation—quiet exhaust fans, ducted airflow, or even a thermostatically controlled system. Remember, the goal is to keep the heat out while maintaining a peaceful environment.

Portable Recording Booth for Home Studio, Foldable Sound Isolation Vocal Shield with Floor Stand, High-Density Acoustic Blanket Enclosure for Singing, Voiceover & Podcast, Includes Phone Holder
INSTANT STUDIO-QUALITY "DRY" SOUND: Transform any noisy room into a professional vocal booth instantly. Engineered with high-density acoustic...
As an affiliate, we earn on qualifying purchases.
As an affiliate, we earn on qualifying purchases.
What’s the Difference? Acoustic Dampening vs. Soundproofing
Understanding the difference helps you choose the right approach. Acoustic dampening inside your closet reduces echo, reverb, and boxiness—making your recordings clearer. Soundproofing, on the other hand, keeps sound from escaping or entering—giving you privacy and preventing noise bleed.
For example, placing foam panels on the ceiling and walls absorbs reflections. Sealing gaps around the door with weatherstripping prevents sound from leaking out. According to Soundproof Cow, most small-room sound issues are about reflections, not noise escaping.
In a tiny closet, combining both—dampening inside and sealing gaps—yields the best results. Foam or panels tame reflections, while sealing blocks sound leakage.
Deeply understanding this distinction allows you to prioritize your modifications. If your main issue is echo, focus on dampening. If you notice sound leaks outside, then sealing gaps is critical. Often, a balanced combination provides the cleanest, most professional sound.

2 Pack Studio Monitor Isolation Pads for Large Speakers Sound Insulation Studio Foam Prevents Vibrations Acoustic Speaker Isolation Pad High Density Fits Most Stands
Enhanced Sound Clarity: Saiqiang speaker isolation pads can reduce vibrations and resonance, providing cleaner, more accurate sound from...
As an affiliate, we earn on qualifying purchases.
As an affiliate, we earn on qualifying purchases.
Placement Matters More Than Just Adding Foam
Where you put your acoustic treatment is more important than how much foam you buy. The key is treating the reflection points—those spots where sound bounces back at your microphone. Think of it like catching the echoes before they muddy your recordings.
For example, in a small closet, the main reflection points are the side walls near the mic, the ceiling, and sometimes the door. Placing foam panels or blankets at these spots drastically reduces reverb and makes your voice sound cleaner.
Some DIY creators focus on treating the door, shelves, and ceiling because these are common hotspots for reflections. Use a mirror trick to find the reflection points: have someone move a mirror along the wall while you sit in your usual mic position. Wherever you see a reflection, treat that spot. Recognizing these key spots ensures your treatment is effective and cost-efficient, avoiding unnecessary over-treatment in less critical areas.
Beyond just placing foam, understanding where reflections originate allows you to make smarter choices about treatment placement. For instance, treating the ceiling can prevent sound from bouncing back down onto your mic, while addressing side walls reduces lateral reflections that can smear your recordings. This strategic approach maximizes your limited resources and results in a cleaner, more professional sound.
Small Room, Big Problems: Parallel Walls and Low-End Buildup
Small, rectangular closets often suffer from standing waves—resonances that boost or cancel certain bass frequencies. This makes your recordings sound boomy or thin, depending on the spot. The fix? Bass traps in the corners and strategic placement of soft materials.
For example, a singer-songwriter in a tiny closet noticed a muddy bass sound. Adding bass traps in the upper corners and hanging a thick blanket behind the mic cleared up the low end—making the vocals sound tight and punchy.
According to Soundproof Cow, treating these low-frequency hotspots stops the buildup and improves overall clarity. Without addressing these problem areas, your recordings may sound uneven or muffled, which can be frustrating and require re-recording or heavy editing. Proper low-end treatment ensures your recordings are balanced and professional, even in tight spaces.
Seal the Gaps: Doors, Cracks, and Hard Surfaces
Sound escapes through cracks, gaps, and hard surfaces. Sealing your closet door with weatherstripping or acoustic sealant makes a huge difference. For example, a content creator taped blankets around the doorframe and added a door sweep, cutting out most of the leakage. For additional sealing techniques, visit this resource on sealing gaps.
Blocking reflections off shelves, windows, and other hard surfaces with foam or fabric also helps. DIY tricks like hanging moving blankets or layering curtains can reduce echo and prevent sound from leaking out or coming in.
Proper sealing turns a noisy, echoey closet into a professional-sounding booth—fast and cheap. The key is to identify all potential leak points and address them systematically. Even small gaps can significantly degrade your sound quality, so attention to detail here yields a noticeable improvement.
Floor and Soft Materials: Why Rugs and Blankets Matter
Hard floors reflect sound, creating a hollow, boxy tone. Covering the floor with rugs or thick carpets absorbs these reflections. For example, a podcaster layered a shaggy rug in their closet, which smoothed out the sound and reduced echo.
Soft materials like blankets, moving blankets, and thick fabrics are versatile DIY solutions. They absorb mid and high frequencies, making your recordings clearer and less echoey.
Using these materials strategically—especially in combination with wall treatments—can dramatically improve your room’s acoustics. They are inexpensive and easy to deploy, yet highly effective in reducing unwanted reflections and creating a warm, professional quality sound.
Mic Choice and Room Size: How They Shape Your Sound
The size of your closet and your microphone choice work together. Smaller spaces amplify reflections, so a directional mic (like a cardioid or hypercardioid) helps isolate your voice. A large diaphragm condenser might pick up more room noise in a tiny closet.
For example, a voiceover artist switched to a shotgun mic in their closet, which cut down on side reflections and gave a cleaner vocal sound. The smaller the room, the more you need to control nearby surfaces and use a tight polar pattern.
Remember: treatment alone can’t fix everything—matching mic and space is key. Choosing the right microphone for your environment can significantly reduce unwanted room sound, but it works best when combined with proper placement and acoustic treatment. This synergy can make even a tiny closet produce broadcast-quality recordings.
Frequently Asked Questions
Can a closet really work as a vocal booth?
Yes, in small spaces like closets, proper reflection control and sealing make them surprisingly effective for vocals and voiceovers. Just focus on treating reflection points and sealing gaps for best results.
What is the best way to block sound from escaping a closet?
Sealing gaps with weatherstripping, acoustic sealant, and adding mass to the door or walls prevents sound leakage. Layering blankets or foam around door frames also helps significantly.
Do I need bass traps in a small closet?
Only if you notice boomy or muddy low frequencies. Placing bass traps in the upper corners can tame low-end buildup and improve overall clarity.
How do I prevent my closet from overheating?
Use active ventilation—quiet exhaust fans, ducted airflow, or thermostatic systems—to keep the space cool. Proper airflow prevents noise from fans and protects your gear.
How much treatment do I really need?
Focus on the main reflection points: behind the mic, side walls, ceiling, and door. Covering these areas with foam or blankets will vastly improve sound quality without overdoing it.
Conclusion
Turning a closet into a professional-sounding recording space isn’t magic—it’s about smart placement and targeted treatment. Focus on controlling reflections and sealing gaps, and your recordings will sound clearer and more polished.
Remember, the best 'rig' often isn’t where your gear is—it’s how you control what’s around it. A little effort now saves countless hours of re-recording later. So, get creative, keep it cool, and enjoy the quiet, clean sound of your new closet studio.