Regular cleaning of your KitchenAid Classic mixer is essential for optimal performance and long-term durability. Proper cleaning ensures that food residues don’t build up and that your appliance remains hygienic. Follow these simple, safe steps to keep your mixer in top shape.
Always unplug your mixer before cleaning to prevent accidents. Use gentle cleaning methods and avoid abrasive materials that could damage the surfaces or internal components.
Key Takeaways
| Safety First | Always unplug before cleaning to avoid electrical hazards. |
| Disassemble Carefully | Remove detachable parts for thorough cleaning. |
| Use Gentle Cleaners | Avoid abrasive cleaners; opt for mild soap and water. |
| Dry Completely | Ensure all parts are dry before reassembling to prevent rust. |
| Regular Maintenance | Clean after each use to prevent buildup and maintain performance. |

Stainless Steel Flat Beater for KitchenAid 4.5-5 Qt Tilt-Head Stand Mixers, Fits Classic, Classic Plus, Artisan Series, Heavy Duty Replacement for K45SS, KSM75, KSM150, Dishwasher Safe
🌟【Heavy-Duty Durability】Engineered for superior strength and longevity, this replacement paddle is built to handle heavy-duty mixing tasks. From...
As an affiliate, we earn on qualifying purchases.
Unplug and Disassemble
- Unplug your KitchenAid Classic mixer from the power outlet.
- Remove the flat beater, dough hook, or wire whip depending on what you used.
- Detach any removable parts like the bowl, beater, and splash guard.
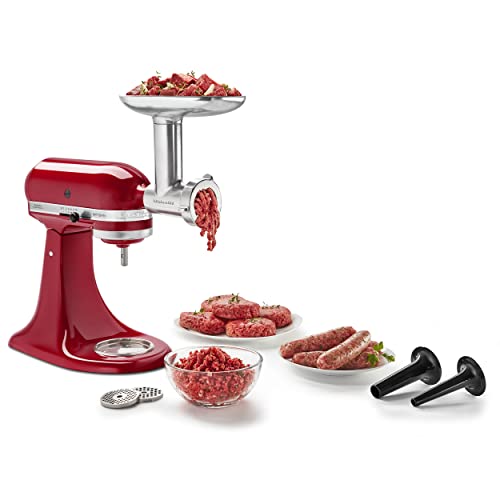
KitchenAid Stand Mixer Attachment, Food Grinder KSMMGA, Metal Food Grinder
Connect to any household KitchenAid Stand Mixer power hub and use the power of the motor to run...
As an affiliate, we earn on qualifying purchases.
Clean the Attachments and Bowl
- Wash the beater, dough hook, or wire whip in warm, soapy water.
- Use a sponge or soft brush to remove any stuck-on food particles.
- Rinse thoroughly and dry with a clean towel.
- Wash the mixing bowl with mild soap, rinse, and dry completely.
Clean the Mixer Body
Wipe the mixer body with a damp, soft cloth. Avoid using abrasive cleaners or soaking the mixer in water. For stubborn spots, use a mild dish soap diluted in water, then wipe with a clean, damp cloth. Dry immediately with a soft towel.
Reassemble and Maintain
Ensure all parts are completely dry before reassembling. Store your attachments in a dry place. Regularly check for any signs of wear or damage, and replace parts as needed to keep your mixer functioning smoothly.
The Products in This Guide

Stainless Steel Flat Beater
- ✔ Weight: Approx. 1.2 lbs
- ✔ Dimensions: 5.5 x 4 x 2 inches
- ✔ Warranty: Manufacturer’s 1-year

KitchenAid Stand Mixer Attachment
- ✔ Color: Metallic
- ✔ Warranty: 1-year
- ✔ Storage: Included case
Stainless Steel Flat Beater
This stainless steel flat beater is engineered for heavy-duty mixing on KitchenAid 4.5-5 Qt tilt-head mixers. It’s dishwasher safe and resistant to bending or breaking, making it a reliable choice for frequent use.
Pros:
- Heavy-duty construction
- Dishwasher safe
- Perfect fit for popular models
- No paint chipping
Cons:
- May require more frequent cleaning of food residues
- Purely a replacement part, not a cleaning tool
Best for: Heavy batter mixing, dough kneading, mashing potatoes
Not ideal for: Light mixing tasks or models outside the specified series
Bottom line: A sturdy, dishwasher-safe beater that handles tough mixing jobs reliably.
KitchenAid Stand Mixer Attachment
This metal food grinder attachment expands your KitchenAid stand mixer’s capabilities, allowing you to process meats, vegetables, and more with ease. It’s easy to clean and designed for efficient, safe operation.
Pros:
- Multiple grinding plates
- Includes sausage stuffer tubes
- Large food tray
- Made of durable metal
Cons:
- Requires separate purchase
- Cleaning requires disassembly
Best for: Grinding meat, vegetables, and making sausages
Not ideal for: For those only needing basic mixing functions
Bottom line: A durable attachment that turns your mixer into a versatile food processing station.
Frequently Asked Questions
Can I put the attachments in the dishwasher?
The stainless steel flat beater is dishwasher safe, but it’s best to hand wash other attachments unless specified otherwise. Always check manufacturer instructions.
What should I do if my mixer is not turning on after cleaning?
Ensure the mixer is properly plugged in and the speed control is set to ‘off’ before plugging in. Check for any visible damage or loose parts.
How often should I clean my KitchenAid mixer?
Clean your mixer after each use, especially if you’ve used ingredients like dough or batter that can cause buildup. Regular cleaning keeps it running smoothly.
Is it safe to submerge the motor housing in water?
No, never submerge the motor housing or base in water. Clean the exterior with a damp cloth and avoid getting water into the motor compartment.
Keep Your KitchenAid Classic in Top Shape
By following these simple cleaning steps, you can ensure your KitchenAid Classic mixer remains hygienic and performs optimally for years to come. Regular maintenance not only prolongs the lifespan of your mixer but also guarantees consistent results every time you bake or cook.
Affiliate disclosure: As an Amazon Associate we earn from qualifying purchases. Prices and availability are accurate as of the time of publishing.